Antibiotic Resistance Lab 29 Days
Background
Much to our chagrin (from a medical perspective), bacteria often quickly evolve resistance to antibiotic pressures. This rapid evolutionary response is partly due to the large population sizes and short generation times of bacteria. Although these resistant mutants survive in the presence of antibiotics (while their sensitive ancestors do not) these mutant strains generally have a lower fitness in an antibiotic-free environment (e.g., a slower growth rate or higher death rate). This might lead us to expect that if an antibiotic pressure is removed and if a sensitive strain is regenerated by back mutation (termed a reversion) the population of resistant bacteria might be out-competed by the reverting sensitive strain.
Interestingly, studies have shown that some antibiotic resistant strains, growing in the absence of antibiotics, do not revert to sensitivity, but maintain their resistance (e.g., Schrag et al. 1997, Reynolds 2000). These studies show that further mutations in the resistant strain compensate for the cost of resistance, but the strain does not lose the original resistant mutation. The goal of this lab is to explore the frequency of reversion versus compensation and to probe the fitness effects of antibiotic resistance.
Lab Overview
This lab starts on Day 3 of the Luria-Delbrück lab. On the LB dishes impregnated with rifampicin used in this former lab, you will have colonies of rifampicin-resistant bacteria. You will select two colonies from these dishes (e.g., two rifR strains). You will evolve these bacteria in a shaken liquid broth environment (without the presence of rifampicin), making daily transfers for 28 days. On Day 2 of this lab, you will freeze a sample of each of your two strains. On Day 26, you will "re-animate" your Day 2 frozen samples. On Day 27, you will initiate head-to-head competitions between your Day 2 cultures and their sensitive ancestor, and between your Day 27 cultures and the same sensitive ancestor. You will be able to compute fitness of the evolving strains relative to the sensitive ancestor. Thus, you will assess the initial cost (if any) of rifampicin resistance and then the change in that cost due to reversion or compensation. Finally, you will determine whether your originally resistant strain has reverted or compensated over its evolution in the absence of rifampicin.
Lab Logistics
In this lab you will be exploring evolution in real time. Thus, this lab will run over several weeks. On Day 1 of this lab (which is Day 3 of the Luria-Delbrück lab), you will select your antibiotic resistant strains and initiate them into the liquid broth environment—this should only take about 15 minutes. On Day 2, one member of your group will freeze a sample of each of your two strains. From Days 2-26, one member of your group will need to come to the lab every day (excluding weekends) in order to transfer your evolving cultures to fresh liquid media. This means that each group member will need to come to lab for around 15 minutes about once a week. Day 27 (which will occur during a normal class lab time) should take 1 ½ hours to complete. Day 28 should take 1 ½ hours (and only requires two group members to attend). Day 29 should take less than ½ hour and only requires one group member to attend (to count plates).
Day 1 (Thursday)
1 person/group needed
Daily Overview
Pick two rifampicin-resistant strains and initiate them into liquid culture. Initiate a third, rifampicin-sensitive strain, which will be evolved alongside the resistant strains as a control.
Materials
- 2 LB + rifampicin Petri dishes with rifampicin resistant E. coli colonies
- 1 LB Petri dish with rifampicin sensitive E. coli colonies
- A wire loop
- 3 18mm tubes containing 5mL of minimal glucose media
- 18mm tube rack
- Burner and a striker
- 70% ethanol spray bottle and Kimwipes
- Sharpie marker
- Waste Bucket
Protocol
- This lab begins immediately after the Luria-Delbrück lab ends. After counting colonies on your LB dishes impregnated with rifampicin to finish the Luria-Delbrück lab, select two of these dishes with colonies (Remember- these rifampicin dishes are orange in color). After counting colonies on your LB dishes without rifampicin, select one of these dishes with colonies.
- Label the three 18mm tubes "A", "B", and "C" and then add your group’s initials, the date, and D-1 (for day number 1) on each tube (tubes A and B will be the evolving resistant strains, tube C will be the sensitive control).
- Turn on your gas and light your burner. Put on gloves.
- Standing away from the flame, ethanol sterilize the wire loop and wipe off the ethanol with a Kimwipe.
- After the ethanol has dried completely (Remember- ethanol is flammable), place the loop end of the wire loop into the top part of your flame and let the loop glow red-hot for 5 seconds.
- Open one of the LB dishes with the rifampicin resistant colonies and cool the loop into the agar (away from any of the colonies). After the loop has cooled, drag the loop through a single colony (make sure that part of the colony is actually on the wire loop). Then dip the loop (with the colony on it) into the tube labeled "A" (make sure that some of the colony comes off in the tube).
- Hold the loop end of the wire under the flame (this will kill any residual bacteria).
- Repeat steps 4-7, placing a colony from your second LB dish with rifampicin into tube "B".
- You will also propagate a control strain from one of the LB Petri dishes plated during the Luria-Delbrück Lab. To do this, repeat steps 4-7 once again, but this time, select a rifampicin-sensitive colony from one of your LB Petri dishes (without rifampicin), and place it into a tube labeled "C".
- Take your tubes to the shaking incubator for overnight growth.
- TURN OFF GAS. Clean up lab bench.
Day 2 (Friday)
1 person/group needed
Daily Overview
Freeze down samples from the cultures started yesterday and initiate the day-to-day serial transfers.
Materials
- 3 18mm tubes with 5 mL of your strains from the previous day
- 3 18mm tubes containing 5 mL of minimal glucose media
- 18mm tube rack
- Pipettemen and tips
- Waste Bucket
- 3 sterile Eppendorf tubes
- Gloves
- Vortexer
- Sharpie marker
- Burner and striker
- 70% ethanol spray bottle & Kimwipes
Protocol
- Label your three 18mm tubes "A", "B", and "C" and add your group initials, the date, and the day number (D-2) on each tube. Label your Eppendorf tubes "A", "B", and "C" and add your group initials and D-2 on each tube.
- Turn on your gas and light your burner. Put on gloves.
- Retrieve your three fully-grown cultures ("A", "B" and "C") started the previous day from the shaking incubator.
- Using a sterile tip, pipette 1000 µL of the fully grown culture labeled "A" into the Eppendorf tube labeled "A". Dispose of tip.
- Using a sterile tip, pipette 1000 µL of the fully grown culture labeled "B" into the Eppendorf tube labeled "B". Dispose of tip.
- Using a sterile tip, pipette 1000 µL of the fully grown culture labeled "C" into the Eppendorf tube labeled "C". Dispose of tip.
- Using a sterile tip, pipette 25 µL of the fully grown culture labeled "A, D-1" into the tube with fresh minimal medium labeled "A, D-2". Dispose of tip.
- Using a sterile tip, pipette 25 µL of the fully grown culture labeled "B, D-1" into the tube with fresh minimal medium labeled "B, D-2". Dispose of tip.
- Using a sterile tip, pipette 25 µL of the fully grown culture labeled "C, D-1" into the tube with fresh minimal medium labeled "C, D-2". Dispose of tip.
- Vortex tubes "A, D-2", "B, D-2" and "C, D-2" for 10 seconds each. (Make sure your vortexer is set at an appropriate speed-- not too high).
- Take your tubes to the shaking incubator for overnight growth.
- TURN OFF GAS. Clean up lab bench. The TA will take the Eppendorf tubes to the deep freeze (they will be stored at -80°C for 24 days).
Days 3-26
1 person/group needed
Daily Overview
Continue the day-to-day serial transfers. A single group member will need to come in each day (excluding weekends)—all group members should meet and discuss a workable schedule for everyone.
Materials
- 3 18mm tubes with 5 mL of your strains from the previous day
- 3 18mm tubes containing 5 mL of minimal glucose media
- 18mm tube rack
- Pipettemen and tips
- Waste Bucket
- Gloves
- Vortexer
- Sharpie marker
- Burner and striker
- 70% ethanol spray bottle & Kimwipes
Protocol (this is written for Day X, where X is some number between 3 and 26):
- Label your three tubes "A", "B", and "C" and add your group initials, the date, your bacterial strain, and the day number ("D-X") on each tube.
- Turn on your gas and light your burner. Put on gloves.
- Retrieve your fully-grown cultures ("A", "B", and "C") started the previous day from the shaking incubator.
- Using a sterile tip, pipette 25 µL of the fully grown culture labeled "A, D-(X-1)" into the tube with fresh minimal media labeled "A, D-X". Dispose of tip.
- Using a sterile tip, pipette 25 µL of the fully grown culture labeled "B, D-(X-1)" into the tube with fresh minimal media labeled "B, D-X". Dispose of tip.
- Using a sterile tip, pipette 25 µL of the fully grown culture labeled "C, D-(X-1)" into the tube with fresh minimal media labeled "C, D-X". Dispose of tip.
- Vortex tubes "A, D-X", "B, D-X", and "C, D-X" for 10 seconds each.
- TURN OFF GAS.
- Take your tubes to the shaking incubator for overnight growth and place your fully grown culture tubes from yesterday in the appropriately marked area.
- Clean up lab bench.
Day 26 (Monday)
1 person/group needed
Daily Overview
Perform the last serial transfer and reanimate your Day 2 frozen samples.
Materials
- 3 18mmtubes with 5 mL of your strains from the previous day
- 6 18mm tubes containing 5 mL of minimal glucose media
- 18mm tube rack
- 3 Eppendorf tubes (defrosted samples of your "A", "B", and "C" Day 2 cultures)
- Eppendorf tube rack
- Pipettemen and tips
- Waste Bucket
- Gloves
- Vortexer
- Sharpie marker
- Burner and striker
- 70% ethanol spray bottle & Kimwipes
Protocol
- This first step should have been completed by a lab member in your group that conducted culture transfers for your group the previous Friday. This involved labeling six tubes with your group name and the date, and the following:
"A, D-2""B, D-2""C, D-2""A, D-26""B, D-26""C, D-26"
- This step and all the following steps for this day will be done by someone from our instructional team, but the steps are included here so that your group knows what happened. Our instructional team member will start by collecting the tubes (labeled by a member of your group) to reanimate your frozen Day 2 cultures (the ancestors) and conduct the final transfers for your A, B, and C lines.
- Someone from our instructional team will turn on the gas, light the burner, and put on gloves.
- Someone from our instructional team will pipette 25 µL of the defrosted sample in the Eppendorf tube labeled "A" into the tube labeled "A, D-2".
- Someone from our instructional team will pipette 25 µL of the defrosted sample in the Eppendorf tube labeled "B" into the tube labeled "B, D-2".
- Someone from our instructional team will pipette 25 µL of the defrosted sample in the Eppendorf tube labeled "C" into the tube labeled "C, D-2".
- Someone from our instructional team will retrieve your three fully-grown cultures "A", "B" and "C", started the previous day, from the shaking incubator.
- Using a sterile tip, someone from our instructional team will pipette 25 µL of the fully grown culture labeled "A, D-25" into the tube with fresh minimal media labeled "A, D-26" (and dispose of the tip).
- Using a sterile tip, someone from our instructional team will pipette 25 µL of the fully grown culture labeled "B, D-25" into the tube with fresh minimal media labeled "B, D-26" (and dispose of the tip).
- Using a sterile tip, someone from our instructional team will pipette 25 µL of the fully grown culture labeled "C, D-25" into the tube with fresh minimal media labeled "C, D-26" (and dispose of the tip).
- Someone from our instructional team will vortex all six freshly inoculated 18mm tubes for 10 seconds each.
- Someone from our instructional team will take your tubes to the shaking incubator for overnight growth and place your fully grown culture tubes from yesterday in the collecting bin.
- Someone from our instructional team will then turn off the gas, and clean up your lab bench.
Day 27 (Tuesday)
Daily Overview
Initiate the competitions between your evolved E. coli strains and an ancestral strain, and begin the procedure for determining if the evolved strains are still antibiotic resistant.
Materials
- 3 18mm tubes with 5 mL of D-2 labeled cultures ("A", "B", and "C")
- 3 18mm tubes with 5 mL of D-26 labeled cultures ("A", "B", and "C")
- 1 18mm tube with 5 mL of "BK27"
- 6 18mm tubes with 5 mL of minimal glucose media (competition tubes)
- 18mm tube rack
- 12 TA Petri dishes
- 3 LB Petri dishes
- 3 Eppendorf tubes
- Eppendorf tube rack
- 2 microtiter plates filled with 270 µL of saline
- Pipettemen and tips
- A tube filled with sterile glass beads
- 1 sharpie marker
- Vortexer
- Gloves
- 70% ethanol spray bottle & Kimwipes
- Beaker with ethanol (NOTE: Ethanol is flammable)
- Waste Bucket
- Burner & Striker
Protocol
- Your TA will start lab with a quick review of pipetting, plating bacteria on hard agar and basic sterile technique.
- Along with your group name and the date, label the 6 media-filled tubes "Comp A D-2", "Comp B D-2", "Comp C D-2", "Comp A D-26", "Comp B D-26", and "Comp C D-26". Label column #1 of the first microtiter plate "A D-2 T=0", column #2 "B D-2 T=0", column #3 "C D-2 T=0", column #4 "A D-26 T=0", column #5 "B D-26 T=0", and column #6 "C D-26 T=0". Label column #1 of the second microtiter plate "A D-26 ALONE", column #2 "B D-26 ALONE" and column #3 "C D-26 ALONE". Put your group name and date on the microtiter plates too. Along with your group name and the date, label the 12 TA Petri dishes as follows:
"Comp A D-2 10-4 T=0"
"Comp B D-2 10-4 T=0"
"Comp C D-2 10-4 T=0"
"Comp A D-2 10-5 T=0"
"Comp B D-2 10-5 T=0"
"Comp C D-2 10-5 T=0"
"Comp A D-26 10-4 T=0"
"Comp B D-26 10-4 T=0"
"Comp C D-26 10-4 T=0"
"Comp A D-26 10-5 T=0"
"Comp B D-26 10-5 T=0"
"Comp C D-26 10-5 T=0"
- Along with your group name and the date, label the three LB dishes "A D-26 10-6", "B D-26 10-6" and "C D-26 10-6". (Again, the microtiter plates, competition tubes and Petri dishes all need to be labeled with your group’s initials and the date.)
- Retrieve your 6 fully-grown cultures ("A D-2", "B D-2", "C D-2", "A D-26", "B D-26", and "C D-26") started the previous day from the shaking incubator.
- Turn on your gas and light your burner. Put on gloves.
- Using a sterile tip, pipette 25 µL from the "A D-2" fully-grown culture tube to the "Comp A D-2", tube. Dispose of tip.
- Using a sterile tip, pipette 25 µL from the BK27 tube to the "Comp A D-2" tube and vortex the "Comp A D-2" tube. Dispose of tip.
- Repeat steps 6 and 7 for cultures "B D-2", "C D-2", "A D-26", "B D-26", and "C D-26" using competition tubes "Comp B D-2", "Comp C D-2", "Comp A D-26", "Comp B D-26", and "Comp C D-26" respectively. (Each of these competition tubes will thus receive 25 µL of "BK27").
- Using a sterile tip, perform a dilution series of the mixture in the "Comp A D-2" tube in the column labeled "A D-2 T=0" in the first microtiter plate, using 30 µL from each dilution into the next (as in previous labs). Dispose of tip.
- Repeat step 9 for competition tubes "Comp B D-2", "Comp C D-2", "Comp A D-26", "Comp B D-26", and "Comp C D-26" to be diluted into the columns labeled "B D-2 T=0", "C D-2 T=0", "A D-26 T=0", "B D-26 T=0", and "Comp C D-26 T=0" respectively. After you have finished, place all 6 "Comp" labeled tubes in the shaking incubator for overnight growth.
- Put 6-8 glass beads onto the TA Petri dish labeled "Comp A D-2 10-4 T=0". Using a sterile tip, pipette 100 µL of the 10-4 dilution from the column labeled "A D-2 T=0" and dispense on the TA Petri dish. Shake the Petri dish to spread out the bacteria, until the beads appear dry. Gently pour glass beads into the beaker with ethanol. Put 6-8 glass beads onto the TA Petri dish labeled "Comp A D-2 10-5 T=0". Using a sterile tip, pipette 100 µL of the 10-5 dilution from the column labeled "A D-2 T=0" and dispense on the TA Petri dish. Shake the Petri dish to spread out the bacteria, until the beads appear dry. Gently pour glass beads into the beaker with ethanol.
- Repeat step 11 for the 10-4 and 10-5 dilutions of "Comp B D-2", "Comp C D-2", "Comp A D-26", "Comp B D-26", and "Comp C D-26" using the appropriately labeled TA dishes for each plating.
- Using a sterile tip, perform a dilution series from the fully grown culture in the "A D-26" tube in the column labeled "A D-26 ALONE" in the second microtiter plate.
- Put 6-8 glass beads onto the LB Petri dish labeled "A D-26 10-6". Using a sterile tip, pipette 100 µL of the 10-6 dilution from the column labeled "A D-26 ALONE" in the second microtiter plate and dispense on the LB dish. Shake the Petri dish to spread out the bacteria, until the beads appear dry. Gently pour glass beads into the beaker with ethanol.
- Repeat steps 13 and 14 using the "B D-26" and "C D-26" tubes (and the columns "B D-26 ALONE" and "C D-26 ALONE" and the LB dishes "B D-26 10-6" and "C D-26 10-6").
- Using a sterile tip, pipette 1000 µL of the fully grown culture labeled "A D-26" into an Eppendorf tube. Dispose of tip. Label the Eppendorf tube with "A D-26" and your group initials.
- Using a sterile tip, pipette 1000 µL of the fully grown culture labeled "B D-26" into an Eppendorf tube. Dispose of tip. Label the Eppendorf tube with "B D-26" and your group initials.
- Using a sterile tip, pipette 1000 µL of the fully grown culture labeled "C D-26" into an Eppendorf tube. Dispose of tip. Label the Eppendorf tube with "C D-26" and your group initials.
- TURN OFF THE GAS and clean up your lab bench. Take your TA and LB dishes and place them in the incubator overnight. The TAs will collect your Eppendorf tubes and take them to the freezer.
Day 28 (Wednesday)
2 people/group needed
Daily Overview
Finish the competition between the ancestral and the evolved E. coli. Count colonies giving the initial densities of your competing strains. Use replica plating to determine whether the evolved strains are antibiotic resistant.
Materials
- 6 competition tubes from Day 27
- Petri dishes from yesterday (with colonies)
- 12 TA Petri dishes
- 3 Petri dishes with LB agar (yellow)
- 3 Petri dishes with LB agar + rifampicin
- Microtiter plates from Day 27
- Pipettemen and tips
- 18mm tube filled with sterile glass beads
- 18mm tube rack
- 1 sharpie marker
- Vortexer
- Gloves
- 70% ethanol spray bottle & Kimwipes
- Beaker with 95% ethanol (NOTE: Ethanol is flammable)
- Clicker counter
- 3 sterile velvet squares
- Replica plating tool
- Waste Bucket
- Burner & Striker
Protocol
- Using the first microtiter plate (this should have the first 6 columns already labeled), label column #7 of the microtiter plate "A D-2 T=24", column #8 "B D-2 T=24", column #9 "C D-2 T=24", column #10 "A D-26 T=24", column #11 "B D-26 T=24" and column #12 "C D-26 T=24". Label the TA Petri dishes as follows:
"Comp A D-2 10-6 T=24"
"Comp B D-2 10-6 T=24"
"Comp C D-2 10-6 T=24"
"Comp A D-2 10-7 T=24"
"Comp B D-2 10-7 T=24"
"Comp C D-2 10-7 T=24"
"Comp A D-26 10-6 T=24"
"Comp B D-26 10-6 T=24"
"Comp C D-26 10-6 T=24"
"Comp A D-26 10-7 T=24"
"Comp B D-26 10-7 T=24"
"Comp C D-26 10-7 T=24"
- Label your 3 LB dishes "A D-26 Copy", "B D-26 Copy", and "C D-26 Copy". Label your 3 LB+Rif dishes "A D-26 Rif Copy", "B D-26 Rif Copy" and "C D-26 Rif Copy". In addition, all Petri dishes need to be labeled with the group’s initials and date.
- Retrieve your six competition cultures ("Comp A D-2", "Comp B D-2", "Comp C D-2", "Comp A D-26", "Comp B D-26", and "Comp C D-26") started the previous day from the shaking incubator.
- Turn on your gas and light your burner. Put on gloves.
- Using a sterile tip, perform a dilution series of the culture in the "Comp A D-2" tube in the column labeled "A D-2 T=24" of the microtiter plate. Dispose of tip.
- Repeat step 5, diluting competition tubes "Comp B D-2", "Comp C D-2", "Comp A D-26", "Comp B D-26" and "Comp C D-26" into columns "B D-2 T=24", "C D-2 T=24", "A D-26 T=24", "B D-26 T=24", and "C D-26 T=24", respectively, of the first microtiter plate.
- Put 6-8 glass beads onto the TA Petri dish labeled "Comp A D-2 10-6 T=24". Using a sterile tip, pipette 100 µL of the 10-6 dilution from the column labeled "A D-2 T=24" and dispense on the TA Petri Dish. Shake the Petri dish to spread out the bacteria, until the beads appear dry. Gently pour glass beads into the beaker with ethanol. Put 6-8 glass beads onto the TA Petri dish labeled "Comp A D-2 10-7 T=24". Using a sterile tip, pipette 100 µL of the 10-7 dilution from the column labeled "A D-2 T=24" and dispense on the TA Petri dish. Shake the Petri dish to spread out the bacteria, until the beads appear dry. Gently pour glass beads into the beaker with ethanol.
- Repeat step 7 for the 10-6 and 10-7 dilutions of "Comp B D-2", "Comp C D-2", "Comp A D-26", "Comp B D-26", and "Comp C D-26", using the appropriately labeled TA dishes for each plating.
- Clean replica plating tool and ring with 70% ethanol. Wait for ethanol to dry. Do not touch inside of ring or top of tool after cleaning. Remove ring. Remove sterile velvet square from tin foil (touching only the corner of the velvet square) and place fuzzy side up on to center of replica plating tool. Firmly place ring back onto the replica plating tool pulling velvet tight without touching center of velvet.
- Uncover and invert the LB dish labeled "A D-26 10-6" (this dish should have colonies) over plate replicator column so that the agar in the Petri dish is parallel with the surface of the velvet. Firmly and evenly press dish onto velvet surface. Do not slide dish on surface (this will smear the colonies). Press dish evenly transferring all the colonies on the dish to the velvet surface. Lift dish straight off. Velvet should "peel off" of dish if there was complete contact.
- Keeping the same velvet on, repeat step 9 with the empty Petri dish "A D-26 Copy" and then the empty Petri dish "A D-26 Rif Copy" (make sure to do the rif copy second, not first). Both dishes should be pressed down in the exact same direction (see figure below for the ordering of this replica plating).
- Remove the velvet and dispose of it into the waste.
- Repeat steps 9-12 using dishes "B D-26 10-6", "B D-26 Copy", and "B D-26 Rif Copy" and then "C D-26 10-6", "C D-26 Copy", and "C D-26 Rif Copy" .
- TURN OFF THE GAS and clean up your lab bench. The TA’s will collect your Petri dishes and place them in the incubator overnight.
- On the colony covered TA Petri dishes you started yesterday, count the colonies. The red colonies are your evolving strains (from either Day 2 or Day 26) and the pink colonies are the sensitive ancestor ("BK27"). Record the data on the dishes and enter the data into the appropriate Class Data Google Sheet, which can be found under the Data tab on the course website.

Day 29 (Thursday)
1 person/group needed
Daily Overview
Count colonies to find the final densities of your competing strains. From the results of your replica plating, determine whether your evolving strains are still antibiotic resistant.
Materials
- Petri dishes from Day 28 (with colonies)
- Clicker counter
- Sharpie marker
- Gloves
Protocol
- Count the number of colonies on the TA Petri dishes you inoculated yesterday. The red colonies are your evolving strains (from either Day 2 or Day 26) and the pink colonies are the sensitive ancestor (BK27). Record the data on the dishes and enter the data into the appropriate Class Data Google Sheet, which can be found under the Data tab on the course website.
- Put on a set of gloves. Count the number of colonies on the LB and LB+rif dishes from the replica plating and record the number of colonies on the dishes (note these colonies will probably appear somewhat smeared). Record the data on the dishes and enter the data into the appropriate Class Data Google Sheet, which can be found under the Data tab on the course website.
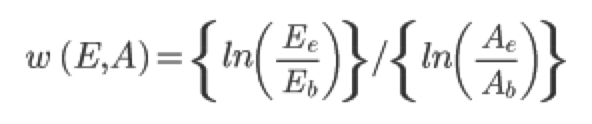
Putting it all together
At this point you have a bunch of colony counts from various Petri dishes. Remember that each colony originates from a single cell. Taking account of the dilutions you performed, you should be able to figure out how many cells of each strain were in the competition tube at the beginning of the assay and at the end of the assay. Let the number of ancestor and evolved cells at the beginning of the assay be given by Ab and Eb, respectively, and the number of ancestor and evolved cells at the end of the experiment be given by Ae and Ee, respectively. Note that BK27 is playing the role of the "ancestor" in all your competitions and the other strains have evolved (for either 2 or 26 days). The fitness of evolved strains relative to their ancestor is given by:
You can now compute the fitnesses of the evolved strains on Day 2 relative to their ancestor and on Day 26 relative to their ancestor for your three cultures ("A", "B", and "C").
From the replica plating exercise, you should know whether your evolving culture (as of Day 26) is made up of mostly drug resistant cells, mostly drug-sensitive cells or a mixture of both (specifically, compare the results of your "Copy" dish with your "Rif Copy" dish).
Questions
- Report all the fitnesses you computed and whether your evolving strains remained antibiotic resistant.
- From the Day 2 relative fitness, do you detect an initial cost to rifampicin resistance? Using the class data, is this cost statistically significant? (Show your work.)
- From the Day 26 relative fitness, do you have evidence for a change in fitness? Using the class data, is this change statistically significant? (Show your work.) Is this consistent with either compensation or reversion?
- Imagine that the relative fitness of your rifR strains started (Day 2) below one (which means the evolving strain was inferior to the ancestor), but by the end (Day 26) soared above one (which means the evolving strain was superior to the ancestor). What interpretation would you give for these results if the evolving strain reverted back to sensitivity? What interpretation would you give for these results if the evolving strain maintained resistance?
- In drug cycling programs, different antibiotics are applied in non-overlapping cycles (for instance in a hospital setting). This means that antibiotic X will be applied for a certain period of time and then removed for a period of time. From the results of your experiment, what are some of the possible outcomes of a drug cycling program? Is it possible that such a program might select for a bacterial strain both drug resistant and superior in growth to its ancestor? How likely do you think this is to occur?
- Bonus Question: Suppose that you find that your original rifR strain has a mutation in the rpoB locus (this gene codes for the ß-subunit of RNA polymerase). After 26 days of evolution, you find that your evolving strain is still resistant (and it still carries the original mutation in rpoB), but it now houses a second mutation at the rpoB locus. Further, assume that this resistant evolved strain is superior in competition with its ancestor. What do you hypothesize has happened? Why hasn’t this competitively superior strain evolved earlier? Assuming you have the ability to perform genetic manipulations, how would you test your ideas?