Orientation Lab
Background
What is "titering"?
Titering is the laboratory measurement of a concentration of a substance.
In this course, titering will be done to measure the concentration (or density) of microbes. The first problem lies, as many of you may already have guessed, in the fact that microbes such as the bacterium Escherichia coli are rather small. It is quite impractical to count all of them in a flask or tube, so we must be a little craftier.
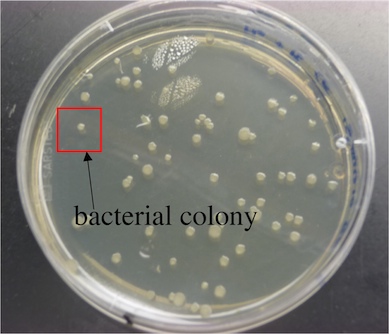
Although an individual bacterium can't be counted by the naked eye, a colony of bacteria can. For instance, if a single E. coli cell landed on a suitable solid growth medium, it would divide through enough generations to form a visible colony. Therefore, by counting colonies, one can measure the amount of individual bacteria present in a sample (1 cell --> 1 colony).
A second problem is that the concentration of microbes we will be using will be quite high. For instance, a grown culture of bacteria can easily have 100,000,000 cells per mL of fluid. If we were to simply spread such a bacterial culture on a Petri dish with solid growth medium, it would form an uncountable (and smelly) lawn. Therefore we dilute our samples before plating.
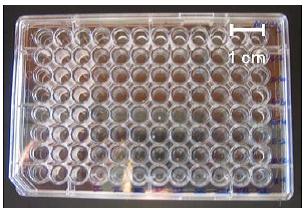
For this and the other labs, we will be using 96 well microtiter (MT) plates for performing dilutions. Each well in the MT plate is filled with 270 µL of saline. Saline (instead of say, water) is used so that the cells are not osmotically stressed in the course of a dilution. In order to achieve a ten-fold dilution, 30µL of the fluid to be sampled will be drawn (aspirated) into a pipette tip and dispensed into a well (30µL into 270µL is a 1/10 dilution). This process is repeated several times; 30µL from the previous well into a fresh well.
After the sample has been sufficiently diluted, it needs to be plated (introduced into a Petri dish where colonies can later be counted). To plate bacteria, sterile glass beads (5-8 or thereabouts) will be placed in Petri dish directly on top of the solid growth medium. Then you will aspirate 100µL from the well of the appropriate dilution and dispense it onto the Petri dish. Shaking the Petri dish (so that the beads roll across its surface) ensures an even spreading of the sample. After shaking, the beads are removed and placed in a beaker containing ethanol. After being placed in a 37°C incubator overnight, the Petri dishes will sport white, circular colonies.
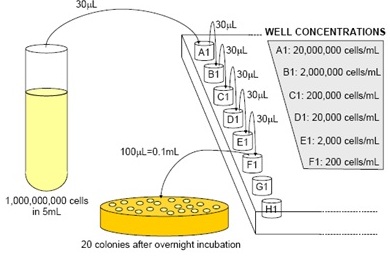
A visual representation of the titering process.
Remember to look over the Example Math Problems before class and make sure you understand how to solve them.
Lab Overview
In this lab, you will receive a tube containing a culture of Escherichia coli, grown up the night before the lab. You will titer the sample to determine the density of bacterial cells. You will also do a "thumbprint exercise" to demonstrate the importance of sterility when working with microorganisms.
Lab Logistics:
This lab will take only one lab session. (You will count the colonies on your Petri dishes the following week.)
Day 1 (Tuesday)
Daily Overview:
You will each titer a sample of bacteria.
Materials
- 18mm tube of fully grown bacterial culture
- 18mm tube with glass beads
- 18mm tube rack
- One 96-well microtiter plate (filled with 270µL of .86% saline in each well)
- 15 Petri dishes with LB agar
- Pipettemen and tips
- Beaker with 95% ethanol (for disposing the glass beads)
- 70% ethanol spray bottle & Kimwipes
- Waste
- Burner & striker
- Markers for labeling your Petri dishes
- Gloves
Protocol
- Your TAs will give an overview of basic sterile technique, pipetting, and plating bacteria.
- Put on a set of gloves. Each person in your group will independently execute the following steps.
- Start by labeling two Petri dishes with the following information: "bacteria, group name, date, initials, and either 10-6 or 10-7"
- Sterilize bench with 70% ethanol (from bottle). After it evaporates (NOTE: ETHANOL IS FLAMMABLE), turn on gas and light burner.
- Using sterile technique, place 5-8 glass beads onto your Petri dishes.
- Label one of the columns in the microtiter plate with your name and perform a series of dilutions to 10-7 of the given culture (i.e., use 7 wells in your dilution series). If you haven't already read the dilution series protocol, please do so before executing this step.
- Using a sterile tip, pipette 100µL of the 10-6 dilution and dispense this aliquot (a small volume of liquid) onto the center of the 10-6 Petri dish. Dispose of tip.
- Shake the Petri dish to spread out the bacteria, taking care not to swirl beads around the circumference of the Petri dish (the beads should cross back and forth while you gently turn the dish). Shake the plate for 1-2 minutes, until the beads appear dry.
- Tip the dish to one side so that all the beads collect together. Flip the dish so that the agar-filled half is on top and the beads drop into the lid. Remove the lid of the dish (in which the beads are resting), and gently pour the glass beads into the beaker with 95% ethanol. Recap your Petri dish.
- Repeat Steps 6-8 on the "10-7" Petri dish.
- TURN OFF GAS. Clean up lab bench. The TAs will direct you to take your Petri dishes to the incubator.
Thumbprint exercise
Background:
Microorganisms are everywhere! Good sterile technique is the first and most important step in ensuring consistent results when working with microbes. Wear gloves not only to protect yourself but also to prevent contaminating cultures.
Lab Overview:
In this lab you will place your thumb on a Petri dish with your hands unwashed, washed, wearing gloves, and after using ethanol on your gloves.
Materials:
- 5 Petri dishes with LB agar (1 per person + a few extra)
- 70% ethanol spray bottle and Kimwipes
- Markers for labeling Petri dishes
- Gloves
Protocol:
- Write your name on the bottom of your petri dish (the side with the agar) near the edge of the dish. Draw 2 intersecting lines on the bottom of the dish to divide it into 4 quarters.
- Lift the lid of your petri dish and gently place your thumb on the 1st quadrant. Light pressure will reveal a thumbprint. Be careful not to crack the agar. Replace the lid and on the edge of the dish label this quarter “unwashed.” (make sure to label the agar side because the lid can move around)
- Wash your hands with soap and water (½ class air dry and ½ use paper towels). Place a thumbprint in the 2nd quadrant of the petri dish. Label the quarter “washed.”
- Put on gloves and gently place your thumb on the 3rd quadrant. Label the quarter "glove"
- Spray ethanol on your gloves and rub your hands together to spread. Again place your thumb on the agar, this time on the 4th quadrant and label that as "EtOH glove".
- Turn the dish upside down and place it in an incubator.
- Incubate overnight 37°C