Gel Electrophoresis
Back to Genetic Protocols
Purpose:
To visualize DNA fragments and determine the quantity of fragments and their size.
DNA (negatively charged) is separated on the basis of size as it migrates through a porous gel matrix (agarose or polyacrylamide) in response to an electrical field. A gel matrix acts as a sieve, slowing the migration of large DNA fragments while allowing smaller fragments to migrate more quickly. Separated DNA fragments can be viewed by staining the gel with ethidium bromide* or some other agent that intercalates between the bases of DNA and fluoresces in response to UV light.
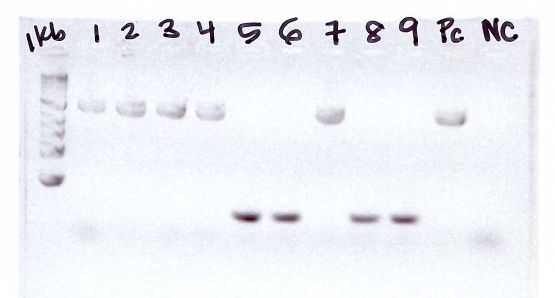
Example of a gel. PC = positive control. NC = negative control. 1 kb ladder is ued for comparison. Reactions 5, 6, 8, and 9 did not amplify the desired fragment; lower bands shown are the result of primer dimers.
Important Safety Information:
* Ethidium bromide (and all agents that intercalate between DNA bases) are powerful mutagens! Always wear gloves and exercise caution when handling these materials. In the Kerr lab, we use GelGreen - safety info about GelGreen available here.
Equipment
- Electrophoresis chamber
- Gel casting tray and combs
- Power supply
- Scale for weighing agarose
Materials
- Agarose
- 1x TAE or TBE buffer
- 6X sample loading buffer
- Gel green
- Parafilm
- 1-10 ul PCR tips (have been autoclaved but are now used in a non-sterile way)
- 1-10 ul pipette
Protocol
Prepare gel:
If your gel protocol requires TAE buffer, then make sure you use TAE for dissolving the agarose (instead of TBE). Do not use old TBE/TAE or water, as depletion of ions results in smearing of the DNA bands in the gel.
- ____ g of agarose to a microwave safe flask*.
- For small fragments, use a higher concentration of agarose so fragments separate out more: Up to 2% for fragments 0.1 – 3 kb
- For large fragments, use a lower concentration of agarose: between 0.7-1% for fragments 0.5 kb – 20 kb
- A standard 1% gel: Gels made in the small gel tank take approximately 0.5 g agarose in 50 ml TBE.
- Add 50 ml 1x TBE buffer. Swirl gently.
- Microwave flask for ~45 seconds, then swirl using hot mitt, and microwave another 15 seconds or so until mixture is bubbling but not overflowing. Agar melts at 100 °C and solidifies at 45 °C. Allow gel to cool for 5-10 min after microwaving.
- Prepare gel tank. Insert gel tray so that it forms a box into which gel can be poured. Make sure rubber lining is properly installed within tray.
- Allow gel to cool to for around 5 minutes until it is no longer letting off steam.
- Immediately before pouring the gel, add 1xGelGreen DNA stain* (5 µl of 10,000x stock into 50 ml). Swirl gently to mix without introducing bubbles. GelGreen will bind to DNA and fluoresce under UV light.
- Pour gel into gel tray. Pop any bubbles with comb. Insert comb(s). Leave the gel to set for at least 30 minutes.
* Because all DNA intercalculating agents, even GelGreen, should be presumed to be mutagens, it's recommended that separate flasks be used for microwaving and adding GelGreen so that residual GelGreen is never microwaved.
Load your PCR samples onto the gel:
- Add 1x TBE or TAE buffer to tray with solidified gel until gel is completely submerged. Your running buffer should be the same as the buffer you use to prepare your gel.
- Mix ~2-4 µl DNA ladder with 2 µl loading dye on parafilm, if not pre-mixed. The loading dye weights the sample so it stays in the well, stops enzyme activity, and provides a tracking dye. The 1 kb ladder size standard will allow you to determine the DNA fragment sizes of samples 10kb-1kb. The 100 bp ladder size standard will allow you to determine the DNA fragment sizes for samples 1kb-100 bp.
- Load ladder sample into the far left well. Load sample carefully to prevent adding bubbles. Do not expel far past the 1st stop.
- Continue mixing each sample with loading dye on a piece of parafilm. Load 4 µl of sample and 1-2 µl of loading dye. If DNA is difficult to visualize (faint bands due to low product) or if you are doing a gel purification, use the wide tooth combs and load up to 40 µl sample (with 4 µl loading dye).
Run gel:
- Place the lid on the gel box, connecting the electrodes.
- Connect the electrode wires to the power supply, making sure the positive (red) and negative (black) are correctly connected. (Remember – “Run to Red”). DNA is negatively charged, and will move towards the positively charged electrode.
- Turn on the power supply to about 100 volts. Maximum allowed voltage will vary depending on the size of the electrophoresis chamber – it should not exceed 5 volts/ cm between electrodes!
- Check to make sure the current is running through the buffer by looking for bubbles forming on each electrode.
- Check to make sure that the current is running in the correct direction by observing the movement of the blue loading dye – this will take a couple of minutes (it will run in the same direction as the DNA).
- Let the power run 30-60 minutes, depending on the expected fragment size. Fragments longer than ~2 kb should be run for an hour. If you are running for more than an hour (say to separate products for gel purification), you should change the running buffer in the tank before hand and don't use more than 100V. It is also a good idea to use TAE buffer instead of TBE and to use a gel box with a recirculator to prevent ion gradients from forming and melting your gel.
- Turn off the power. DO NOT ELECTROCUTE YOURSELF!
- Remove the lid of the electrophoresis chamber.
- Using gloves, carefully remove the gel.
Visualize Gel:
- Place gel in UV box. Close lid, turn off lights, and visualize gel under UV light. Caution: UV light is dangerous - always wear eye/skin protection if there is no inbuilt shield.
- The gel should be viewed under UV (302 nm) and photographed. UV also harms the DNA in the gel, so if you are cutting out a band for purification, cut out as quickly as possible and shut off the UV ASAP.
- Analyze gel: compare bands in sample lanes to size standard. You can also compare your bands to the ladder to get a rough idea of your DNA concentration.
Troubleshooting
Likely, if there are problems visualizing the bands on your gel, there was a problem with your PCR.
Original Protocol by: C. Glenney Date: 20 Aug 2012
Protocol Updated by: H. Lindsey Date: 12 Sept 2012
Back to RifRamp Protocols