Primer Mediated Site-Directed Mutagenesis And Pko V Mediated Allelic Replacement
Purpose
This protocol is used for creating specific mutations that can be delivered to the chromosome of the desired organism via a suicide recombinant vector (in this case, pkoV). The first step involves cloning a fragment of your target gene (flanked with restriction sites on either side) into a small, high copy number cloning vector, such as PCR8. Then your desired mutation will be introduced by using phosphorylated mutagenic primers and a high fidelity polymerase to amplify around the entire plasmid. Once the plasmid is re-circularized and the introduced mutation verified, the mutagenized fragment can be restricted out of the cloning vector, ligated into the suicide recombinant vector, and transformed into competent cells of your wild-type background. Using selective media and temperatures, the plasmid will recombine into the chromosome at the target site and then recombine back out, leaving behind the desired mutation at a rate of approximately 50%. The cell will then be cured of the plasmid (also using selective media).
Introduction and Background
Before you proceed there are several important considerations: Is the gene you are replacing essential? What allelic replacement system will you be using? Is directionality important? The manipulations for the RifRamp project were done on an essential gene using pkoV_unstuff. For this system directionality was not important. This meant that we were able to use the same restriction site on either side of our fragment and only digest our vector pkoV_unstuff with that one enzyme. Because of this, we did not have to gel purify our vector after digestion, greatly increasing our efficiency. Also we didn’t have to worry about double digests, which are annoying. However, because we were working with an essential gene, our cloned fragment had to include either the beginning or the end of the gene. This is because on the first recombination of the allelic replacement protocol, there is a single homologous recombination between the copy of the gene on the suicide plasmid and the copy on the chromosome. If the copy on the plasmid contains only the center of the gene, this recombination will result in two partial gene copies, which matters quite a lot if your cell needs that gene to replicate. Including the beginning or end in your cloning fragment ensures your cell will have one full copy of the essential gene at every step of the protocol.
Generally, the fragment should be chosen so that your mutation will be as close to centered as possible with around 500bp on either side. This allows room for the homologous recombination to occur, but is still small enough to work with easily. If you have to use a larger fragment (say to include the beginning of your essential gene), still center your mutation as much as possible. Larger fragments do pose difficulties (higher probability of an undesired mutation being introduced during amplification, lower efficiency during cloning, everything takes longer, etc.), but keeping your mutations centered means your ratio of colonies with the introduced mutation versus wild type will be as close to 50/50 as possible at the end of the allelic replacement (i.e. less screening for you!).
One more note: this protocol assumes you have to use mutagenesis to introduce a mutation that does not exist alone. However, if you have access to any strain that contains this mutation with 500bp of wild type-y goodness on either side, just clone that and skip the mutagenesis! What is wrong with you?
Designing cloning primers
The primers for cloning your fragment of interest should be unique in your organism’s genome and have annealing temperatures of 55°C-72°C (but within 3°C of each other) without the tags. I use the IDT oligoanalyzer to check my primers. After you have created your primers, you will add a “tag” to the 5’ ends with a few trailing bases and then the restriction site you want to use for cloning into your allelic replacement plasmid. Be sure to check the primers for hairpins and dimerization after adding the tags. (Some dimerization is inevitable as restriction sites are palindromic, so it is especially important that the bases around the site won’t bind to each other as well.)
For instance, here are the primers I use to amplify the first 1000bp of rpoB (centered on bases 436-443, where many rifampicin resistance mutations occur) and add BglII restriction sites (agatct):
Forward: 5’ - gaagatctGTGTTGCACAAACTGTCCGCTC - 3’
Reverse: 5’ - gaagatctCAGGCTCAGCTCCATGTTCG -3’
For the reverse primer, I find it easiest to take the reverse compliment first and then add the restriction site to the 5’ end. Restriction sites are palindromic anyway (the site is the same as its reverse compliment) and adding the site before taking the reverse complement makes it easy to accidently end up with the tag on the 3’ end. Trailing bases should always be added to the 5’ end; non-matching bases on the 3’ end will prevent the primer from annealing.
Mutagenic primers
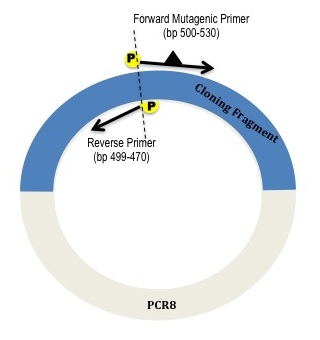
Figure 1: Using phosphorylated mutagenic primers to amplify around PCR8 with cloned gene fragment.
Your mutagenic primers will amplify around the entire plasmid. If you are creating a single nucleotide point mutation (SNP), then you want to center the mutation in your forward primer with 10-15 matching bases on either side. The primers should have melting temperatures of 65C-74C, be 20-30bp long, and be phosphorylated on the 5’ end. So that the entire vector is amplified with no deletions or repeats, the forward primer and reverse primer should be 5’ end to 5’ end, e.g. if the forward primer stretches from base 500 to base 529, then the reverse primer should go from base 499 to base 470.
If you want to create a deletion, say bases 497-499, simply place your forward primer from bases 500-529 and your reverse primer from bases 496-467. Insertions can be created by adding those bases to the 5’ end of your forward primer.
Because you want to create your mutations in a specific site, there is a limited amount of wiggle room if that region contains problematic areas. Try to keep your annealing temperature for your primer higher than the Tm of your worst hairpin and lengthen or shorten your primers as necessary to avoid as many dimeric or repeat sites at as possible. If you have to include a run of As or Ts, make sure that there are enough bases on either side (6 or more) that annealing isn’t terribly compromised. You have a big temperature range to play in, so most problems can be mitigated and if secondary banding still happens you can always gel purify. Remember to phosphorylate your primers or you will not be able to re-circularize your vector after you do your mutagenesis (there’s no ligation without phosphorylation!).
Primers for sequencing and verification
If you are using PCR8 as your cloning vector, the “universal” primers (universal meaning the lab and any sequencing service already has them) GW1 and GW2 can be used to amplify your cloned fragment. However, if your fragment is more than a kb long, you will want to make sure you have some additional sequencing primers in the middle of your fragment. (The general rule is to place sequencing primers 800-900bp apart with at least 100bp of overlap between them.) You will need these anyway, along with a couple of primers located in the chromosome a couple of hundred of bases outside your cloned fragment to sequence verify your engineered mutants after the allelic replacement protocol.
There are also “pkov_confirm_f” and “pkov_confirm_r2” primers (pkov_confirm_r was tragically lost during the removal of the plasmid’s “stuffer region”) that can be used to amplify your cloning fragment after it is cloned into pkoV. This can be useful if you need to verify the length of cloned fragment. (When cloning a large fragment of more than 3kb, you may need to screen many colonies to find an insert of the correct length). These primers can also be paired up with primers inside the cloning fragment to check the orientation of the fragment or with your primers in the chromosome but just outside the cloning region to verify that the first crossover has occurred. (These reactions are not usually necessary, but can be used for troubleshooting on long or troublesome fragments.)
| Primer | 5’-3’ Sequence | MT | Location |
|---|---|---|---|
| pKOV_confirm_f | CCCGGTCGTCGGTTCAGGGC | 65.5°C | pkoV_unstuff MCS upstream |
| pKOV_confirm_r2 | CGCCCTGTAGCGGCGCATTAA | 62.8°C | pkoV_unstuff MCS downstream |
| GW1 (Invitrogen) | GTTGCAACAAATTGATGAGCAATGC | 56.4°C | MCS of pCR8/GW/TOPO |
| GW2 (Invitrogen) | GTTGCAACAAATTGATGAGCAATTA | 53.3°C | MCS of pCR8/GW/TOPO |
Note: The reverse primers in this table are written in terms of one strand of the plasmid and thus are not the 5' to 3' sequence to be ordered (the reverse complement is what is ordered - please confirm all primers with sequence reference).
How the allelic replacement works (JG)
The pKOV plasmid is an 8.7 kb plasmid originating from the Church Laboratory at Harvard Medical School (1). The Kerr Lab received the plasmid in 2010 and Haley Lindsey made some alterations to the vector: she removed a 3 kb ‘stuffer’ sequence from the MCS (because it was homologous to some regions of the BK26 (otherwise known as REL606) chromosome) and added a unique BglII restriction site to the MCS (for ease of cloning with our current restriction enzymes). The final result was a 5.7 kb vector, “pKOV_unstuff” (Fig 2).

Figure 2: Genetic map of the 5.7 kb pKOV_unstuff vector. This image was adapted from the Harvard Medical School website map of pKO3. The pKO3 vector is the pKOV without the 3 kb stuffer sequence. The pKOV_unstuff vector differs from pKO3 because it contains a unique BglII restriction site in the MCS region (located between cat and the M13 ori).
As shown in Figure 2, the pKOV_unstuff vector contains the following markers:
- The cat gene, encoding chloramphenicol acetyltransferase. This provides resistance to chloramphenicol (Cm, bacteriostatic) through inactivation of the antibiotic (covalently links one or two acetyl groups to Cm hydroxyl groups).
- The repA(ts) region (from pSC101) encodes a temperature-sensitive origin of replication - replication of the plasmid occurs at 30°C, but not at 43°C. This can be used in combination with the cat gene to select for types that have incorporated the plasmid into the chromosome.
- The Bacillus subtilis sacB gene encodes levansucrase, the expression of which is lethal in the presence of sucrose (on hypotonic media at 30°C). This is used as a positive selection regime for types that have lost the pKOV vector. The pKOV_unstuff vector can be used to make scar-free allelic replacements (i.e. incorporate mutations or make deletions/insertions) in the Escherichia coli genome.
This is done in three major steps (mirrored in the layout of the methods section):
- The DNA segment of interest is cloned into the BglII site in the MCS of pKOV_unstuff, and the construction is introduced into BK26 (our E. coli B strain of interest) using Cm selection at 30°C (permissive temperature).
- Cells that have incorporated the plasmid into the chromosome via homologous recombination are subsequently selected on Cm at 43°C (nonpermissive temperature).
- Finally, types that have undergone a second round of recombination (and lost the vector) are selected on hypotonic, sucrose-containing media at 30°C.
These types, each of which will either be wild-type or mutant, are subjected to a series of tests to identify and characterize the desired mutant strains.
A note on engineered ancestors
If you are planning to do any sort of fitness assays on your engineered mutants (which I assume you are, otherwise why did you make them?), you can no longer use their wild type common ancestor to judge their relative fitness. Your engineered mutants have been through a lot. They’ve had their cell walls stripped off, had that recombinant vector shoved in them, and been plated repeatedly on a variety of stressful media. Now they can only relate to an “ancestor” that shares those experiences. So you have to make them one.
The preferred way to do this is to clone a wild type copy of your cloning region into pkoV and then reintroduce that copy into each of your engineered mutants. (Just do the entire allelic replacement again introducing the wild type copy of the fragment to competent engineered mutant strains.) This ensures that any fitness effects/genetic changes caused by the protocol are also found in the ancestor. Another (lazier) way to achieve a similar effect is simply to isolate a double crossover wild type at the same time as your double crossover mutant (for each mutant created). Depending on your purposes, this may be fine.
Strains/Vectors
| Name | BK # | Description | Markers |
|---|---|---|---|
| E. coli DH5α-λpir | 15 | E. coli strain commonly used for cloning. Contains recA mutation (no homologous recombination), and is endA- (no endonuclease in plasmid preps). | Plates white on X-gal (lacZ deletion) |
| E. coli TOP10 pKOV_unstuff | 166 | Top10 containing the pKOV_unstuff vector in plasmid form (5.7 kb). The pkoV vector has a temperature sensitive origin of replication and cassettes for chloramphenicol resistance and sucrose sensitivity (in the absence of salt) | Grow at 30°C in LB + 20µg/mL chloramphenicol |
Antibiotic Stocks
Media
- LB miller broth
- LB broth without salt
- LB plates with either 100ug/mL spectinomycin or 20ug/mL chloramphenicol
- LB plates without salt and with sucrose
Buffers
Enzymes
- Fermentas BglII (or any or the other restriction enzyme(s) in the pkoV_unstuff cloning site)
- NEB MluI (if cloning any 2-4 kb fragments)
- Invitrogen CIAP
- NEB T4 DNA ligase
- Genscript Taq
- NEB Phusion
- Fermentas ExoI
Kits
- Qiagen Miniprep kit
- Qiagen Gel Extraction kit
- Qiagen PCR Purification kit
- Invitrogen PCR8/TOPO kit
Competent cells
TOPO cells for cloning into PCR come competent (but are expensive). You will need to make competent DH5α (another cloning strain) for storage of the mutagenized re-circularized cloning fragment and vector using the TBF I/II method . You will also need to make competent cells of your wild-type background. I used the CaCl2 competent cell protocol to make competent BK26 (REL 606/B strain) cells. You should test the effectiveness of various competency methods on your strain. Also, check and make sure your strain is capable of homologous recombination (is not recA-). If not, this protocol is probably not for you!
Primers
| Primer | 5’-3’ Sequence | MT | Location |
|---|---|---|---|
| pKOV_confirm_f | CCCGGTCGTCGGTTCAGGGC | 65.5°C | pkoV_unstuff MCS upstream |
| pKOV_confirm_r2 | CGCCCTGTAGCGGCGCATTAA | 62.8°C | pkoV_unstuff MCS downstream |
| GW1 (Invitrogen) | GTTGCAACAAATTGATGAGCAATGC | 56.4°C | MCS of pCR8/GW/TOPO |
| GW2 (Invitrogen) | GTTGCAACAAATTGATGAGCAATTA | 53.3°C | MCS of pCR8/GW/TOPO |
- Your own BglII (or other enzyme) tagged primers for cloning your region(s) of interest into PCR8
- Your own phosphorylated mutagenic primers (if needed)
- Your own sequencing primers located in the chromosome outside of your cloning region and
Protocol
Day 0
Start overnight culture of the strain containing the desired gene fragment using the appropriate media and conditions.
Day 1
Amplify the fragment of interest
Amplify your desired gene fragment using restriction site tagged primers and phusion polymerase. We use phusion instead of taq for this step because phusion is a high-fidelity polymerase and we don’t want to introduce any undesired mutations. For this protocol, I will be using rpoB_puic3_F and rpoB_puic3_R to amplify the first 1kb of rpoB with BglII tags. Your primers may vary.
| Reagent | Per reaction (µL) | # or Reactions | Master Mix |
|---|---|---|---|
| HF Buffer | 10.0 | 2 | 20 |
| dNTPs | 1.0 | 2 | 2 |
| rpoB_bglII_f1 (5 pmol/µl) | 5.0 | 2 | 10 |
| rpob_bglII_r1 (5 pmol/&micrl;l) | 5.0 | 2 | 10 |
| Phusion | 0.5 | 2 | 1 |
| Template | 1.0 | Add sep | Add sep |
| Milli-Q | 27.5 | 2 | 55 |
| Total | 50 µl |
Thermal Cycler Program
- 98° for 2 min
- 98° for 10 sec
- 60° for 20 sec (adjust annealing temp accordingly)
- 72° for 1 min (30s-1min/kb)
- Repeat 2-4 for 34 cycles
- 72° for 5 minutes (can extent to 10min for long fragments)
- hold at 4°C
After starting your thermal cycler reaction, make and pour a 1% agarose gel (link protocol). This would also be a great time to preheat a water bath to 42°C. After the thermal cycler program is finished, run your gel. If your band is of the proper length, use the Qiagen PCR purification kit to purify your reactions. Elute into 30µL of 60°C Milli-Q and then ice for 5 minutes.
Clone into PCR8/TOPO
PCR8 is a TA cloning vector. It uses the 3’ A overhangs left by Taq to attach to 3’ T overhangs in the PCR8 vector. Phusion is a blunt end polymerase, so we will have to add the A overhangs on with Taq before performing our reaction. We PCR purified our reaction first to get rid of the phusion, because phusion would “fix” the A overhangs back to blunt ends and decrease the efficiency of the cloning reaction.
- Add 3µL of 10x Buffer, 0.3µL of Taq and 0.3µL of dntps to 27µL of your purified pcr product in a pcr vial, incubate at 72°C for 15 minutes, and then at 4°C for 5 minutes. This will put some 3’ A overhangs on your fragment.
- Add 1µL of the PCR8 vector, 1µL of the salt solution (both in -20°C freezer), and 4µL of your PCR reaction (with A overhangs) to a pcr vial, mix by flicking the vial gently, and let incubate for 5 minutes at room temperature. Then put the vial on ice. Don’t retrieve the vector from the -20°C until you are ready to add it and return it immediately when done.
- Retrieve a vial of TOPO cells from the -80°C freezer and thaw on ice. Add 2µL of the cloning reaction and incubate on ice for 5-30 minutes.
- Heat shock the cells at 42°C for 30 seconds, then ice them for 1-2 minutes.
- Add 250µL of room temperature SOC (use LB if no SOC is available). Tightly cap the vial, place the vial in a 50mL flask, and let recover in the 37°C shaker for 1 hour. Label and bead 4 100ug/mL spectinomycin LB plates (per reaction) and pre-warm them in the 37°C incubator.
- Plate a variety of volumes to ensure that at least one plate will have evenly spaced colonies (I do 10µL, 50µL, 100µL, and the rest. If your reaction is extremely efficient, you may want to do a -1 dilution in SOC as well.) Incubate plates at 37°C overnight.
Note that the incubation with Taq can be increased to 30 minutes and an additional PCR purification can be done afterwards if you are having problems with your cloning efficiency.
Day 2
PCR verify insert length
Select 3-4 colonies from the spec plate where they are most evenly spaced. (For large fragments of 3kb or more, you will want to select more, as there are occasionally problems with the cloned fragment being slightly too short. Gel purification before TA cloning can help with this.) Resuspend the colonies in 50uL of Milli-Q in sterile epis. Store the plates in the fridge temporarily in case you need to screen more colonies.
Thaw your reagents on ice. As always, get the enzyme from the -20°C Freezer only when you need it and then immediately return it to the -20°C freezer. Set up the following PCR reaction using the GW1 and GW2 primers, which amplify from either side of the PCR8 cloning site:
| Reagent | Per reaction | # or Reactions | Master Mix |
|---|---|---|---|
| 10x buffer | 2.0 | 6 | 12 |
| dNTPs | 0.5 | 6 | 3 |
| GW1 (5 pmol/µl) | 2.0 | 6 | 12 |
| GW2 (5 pmol/µl) | 2.0 | 6 | 12 |
| Taq | 0.5 | 6 | 3 |
| Re-suspended culture | 1.0 | Add sep | Add sep |
| Milli-Q | 12.0 | 6 | 72 |
| Total | 20 µl |
Thermal Cycler Program:
- 95°C for 2 min
- 95°C for 10 sec
- 45°C for 20 sec
- 72°C for 1 minute 10 seconds (1 minute/kb)
- Repeat 2-4 for 34 cycles
- 72°C for 10 minutes
- hold at 4°C
Run your gel. If any of your colonies give a band of the correct length (the size of your cloning fragment, in this case 1kb), start an overnight culture in 5mL LB +100ug/uL of spectinomycin for extraction/freezedown. For long fragments (4kb or more) make sure to run your gel for a good while (like an hour) and include your PCR product from yesterday in one of the lanes so you have a length comparison more exact than the ladder. You don’t want to select a fragment that is a few hundred of base pairs short.
If you see no bands, you will want to add a positive control to confirm it is not a PCR problem (there are plenty of strains in the RifRamp freezer box with fragments of various sizes in PCR8) and screen more colonies. If this still fails, you may want to try the TA cloning again, adding the additional purification steps and allowing a longer incubation to add the A overhangs. The PCR8 kit also has a positive control you can do alongside: see manual.
Day 3
Perform mutagenic PCR
Use 1 mL of your overnight culture to make a temporary freezedown. Use the Qiagen miniprep kit to extract the plasmid from the rest of the culture. If you cloned a gene fragment with your mutation of interest straight into PCR8, send the plasmid off for sequencing verification and skip straight to day 7. If you need to introduce your desired mutation with site directed mutagenesis, stay here.
PCR8 is a high copy number vector, so your plasmid extraction should be at least 200ng/µL. If you are not confident about the concentration, quantify it using the Epoch. You should dilute your plasmid to less than a 0.1ng/µL for mutagenic pcr to prevent problems with background plasmid at the next transformation step.
Thaw your reagents on ice. As always, get the enzyme from the -20°C freezer only when you need it and then immediately return it to the -20°C freezer. Set up the following reaction:
| Reagent | Per reaction (µL) | # or Reactions | Master Mix |
|---|---|---|---|
| HF Buffer | 10.0 | 2 | 20 |
| dNTPs | 1.0 | 2 | 2 |
| M303_b437_f (5 pmol/µl) | 5.0 | 2 | 10 |
| M271M303_b437_r (5 pmol/µl) | 5.0 | 2 | 10 |
| Phusion | 0.5 | 2 | 1 |
| Template (1,000x diluted plasmid) | 1.0 | Add sep | Add sep |
| Milli-Q | 27.5 | 2 | 55 |
| Total | 50 µl |
Adjust the annealing temp accordingly for your mutagenic, phosphorylated primers. PCR8 is around 3kb long and my insert is 1kb long, for a total of 4kb. I am using a 2 minute extension time (30sec/kb). Larger fragments will need a longer extension time.
Thermal Cycler Program
- 98°C for 2 min
- 98°C for 10 sec
- 65°C for 20 sec (adjust annealing temp accordingly)
- 72°C for 2 min (30s/kb)
- Repeat 2-4 for 34 cycles
- 72°C for 5 minutes
- Hold at 4°C
Run 8µL of product on gel to verify that there is a strong single band at the correct length (for us, 4kb), with no secondary bands or visible plasmid. If these are present (and they commonly are due to the fact you can’t optimize the placement of mutagenic primers), you will need to gel purify your reaction. Running an annealing temperature gradient can help eliminate secondary bands, but since you only need to construct this mutation once, you should just bite the bullet and do the damn gel extraction! If you do have a single, clear band of the correct length you should probably do a PCR purification using the Qiagen kit, as ligation reactions are fairly salt sensitive. Leave the PE buffer on the filter for 2-5 minutes to get rid of as much salt as possible for either purification method.
Re-circularize your plasmid
Thaw 10x ligation buffer on ice. Check to make sure it smells of sulfur (this generally indicates the ATPs are fresh). As always, get the enzyme from the -20°C freezer only when you need it and then immediately return it to the -20°C freezer. Set up the following reaction in a PCR vial:
| Ingredient | Volume per reaction | Total concentration in reaction |
|---|---|---|
| Linear PCR product | ~10µL | 100ng |
| 10x Ligation Buffer (sulfur smell) | 2µL | 1x |
| T4 DNA Ligase (400,000 U/mL) | 1µL | 40 units |
| Milli-Q water | to 20µL | n/a |
Mix gently by flicking the side of the vial, and let sit at room temperature for 10-15 minutes, then incubate at 4°C (in fridge) overnight.
Day 4
Transform into DH5α for storage:
- Thaw individual epis of DH5α on ice. Add 5µL of your overnight ligations to the competent cells and mix by gently flicking the side of the tube. Let incubate for 30 minutes on ice. Prep 42°C water bath. Label, bead, and pre-warm 100µg/µL spectinomycin plates (4 per reaction).
- Heat shock at 42°C for 30 seconds, then ice for 1-2 minutes.
- Add 200µL of LB, place epi in flask, and let recover for 1 hour in 37°C shaker.
- Plate 10µL, 50µL, 100µL and the rest and incubate at 37°C overnight.
DH5α should be used for long term storage of plasmids because it has a recA deletion that prevent any homologous recombination between the vector and the chromosome and also an endA delection that prevents the cell from producing endonucleases that can stick around in minipreps and destroy the plasmid DNA (which is why we do not use strains like REL606 for long term storage!).
Day 5
Start overnight cultures of a few of your transformants in 5mL LB + 100µg/mL spectinomycin. You will need to extract the plasmids for sequencing and make temporary freezedowns for storage. Keep the transformation plates in the fridge just in case you need to screen more.
Also start an overnight culture of pkoV_unstuff/TOP10 in LB + 20µg/mL chloramphicol at 30°C (the plasmid is temperature sensitive).
Day 6
Freeze down 1mL of your potential mutants and use the rest of the culture for plasmid minipreps. Prep a small amount of each vector for sequencing. You will want to use the GW1 and GW2 primers and whatever other internal primers you need to cover the whole cloned fragment.
Also extract the pkoV_unstuff and store it and the rest of your minipreps in the -20°C freezer for cloning tomorrow.
Day 7
Analyze sequences. Verify the presence of your desired mutation and that no secondary mutations were introduced. If none of your isolates contain your desired mutation, you may need to further dilute your template plasmid for your mutagenic PCR and possibly also add a gel extraction step. If all of them contain the same undesired mutation, it was probably from the isolate you chose after cloning your mutational fragment into PCR8/TOPO.
Restrict your insert and vector:
Once you’ve successfully introduced your mutation, you can clone your fragment into pkoV_unstuff.
Set up the following restriction reaction:
| Ingredient | Volume per Reaction |
|---|---|
| Buffer O | 4µL |
| Plasmid | 24µL |
| BglII | 2µL |
| MluI (if insert is 2-4kb long) | 1.5µL |
| Milli-Q water | up to 40µL |
Incubate for at least 2-3 hours at 37°C.
Note: obviously, if you are using (a) different restriction enzyme(s) you will have to adjust your conditions and buffer accordingly. The PCR8 plasmid is 2.8 kb long. If your cloning fragment is around the same length, add MluI to cut the PCR8 vector in the middle (after, of course, verifying that MluI does not cut your fragment anywhere! Look at the PCR8 restriction map for other options if this is a problem).
Dephosphoralation/Purification
After restriction, add 1.5µL of CIAP to the pkoV_unstuff and incubate at 37°C for at least an additional 1.5 hours. Then heat deactivate for 15 minutes at 85°C. Store on ice. CIAPing the vector removes the phosphate groups from the cut ends of the vector, which will prevent it from closing back on itself in the ligation.
Load the entire volume of your PCR8/mutagenic fragment restriction reaction into a wide-well gel and run it out for at least an hour (longer fragments will need longer to separate). Use the Qiagen kit to gel purify the desired fragment.
Ligation
Before proceeding with the ligation you will need to check the concentration of your vector and insert. Adjust their relative volumes in the reaction until you have around 100ng of your vector backbone and 1-6 times as much insert (more is better).
Thaw 10x ligation buffer on ice. Check to make sure it smells of sulfur (this generally indicates the ATPs are fresh). Then set up the following reaction in a PCR vial:
| Ingredient | Volume per reaction | Total concentration in reaction |
|---|---|---|
| pkoV_unstuff (restricted, CIAP’ed) | ~4µL (adjust as necessary) | 100ng |
| Insert (restricted, gel purified) | ~12µL (adjust as necessary) | 100-600ng |
| 10x Ligation Buffer (sulfur smell) | 2µL | 1x |
| T4 DNA Ligase (400,000 U/mL) | 1µL | 40 units |
| Milli-Q water | to 20µL | n/a |
Mix gently by flicking the side of the vial, and let sit at room temperature for 10-15 minutes, then incubate at 4°C (in fridge) overnight.
Day 8
Transformation of mutagenic plasmids into competent ancestor
- For each sample, thaw a vial of chemically competent BK26 cells on ice. Add 5 µl of the overnight ligations to each vial of thawed cells. Use pkov unstuff as positive control and add nothing to the negative control. Mix gently by tapping. Incubate cells on ice for 30 minutes.
- Heat shock each vial of cells at 42°C for 30 seconds and immediately transfer to ice for 2 minutes.
- Add 200 µl of room-temperature, fresh LB to the cells.
- Cap vials tightly, place in a flask, and shake at 30°C for 1.5 to 2 hours.
- Plate 10µL, 50µL, 100µL and rest on freshly made, pre-warmed LB + 20µg/mL chloramphenicol plates. Incubate plates at 30°C for 36-48 hours until visible colonies form.
The pkoV plasmid contains a chloramphenicol resistance cassette and a temperature sensitive origin of replication. Cells transformed with the plasmid will be able to grow on chloramphicol but only at 30°C (the plasmid cannot replicate at higher temperatures).
Day 10
Plating for first crossovers
Resuspend a single colony from each transformation in 100µL of 10% MgSO4 in a labelled, sterile epi and vortex to mix. Also resuspend a colony from your pkoV_unstuff control plate.
If you are working with long or difficult fragments, suspend multiple colonies from each transformation in Milli-Q and perform a PCR using the pkov_confirm_f and pkov_confirm_r2 primers to screen for inserts of the correct length. If you are finding bands at ~200bp, you skimped on your restriction/dephosphorylation of your vector and it was either not completely digested or closed back on itself.
Chloramphenicol is bacteriostatic, not bactericidal, so there may be a light background film of non-transformed cells on your plates. Make sure you don’t pick up any of this while selecting your colony off the plate. If you are having difficulty with this step, you may choose to streak for purification before proceeding to the 1xo step. Pre-heating your plates also helps prevent this film.
Dilute your resuspensions to the -5 in 10% MgSO4 and plate 100µL from the -3, -4, and -5 dilutions onto LB + 20µg/mL chloramphenicol plates that have been pre-warmed to 43°C. Incubate in the 43°C oven overnight.
The pkoV plasmid has a temperature sensitive origin of replication, so at 43°C only cells in which the plasmid has recombined into the chromosome will be able to grow. The colony containing pkov_unstuff with no cloned fragment will serve as a negative control at this step. With no region of homology, the plasmid should be unable to recombine into the chromosome and the cells will not be able to grow on chloramphenicol at 43°C.
Start overnight cultures in LB + 20µg/mL chloramphenicol at 30°C for temporary freezedowns. Keep all plates in the fridge just in case.
Day 11
Plating for double crossover mutants
Examine your 1xo plates. The pkoV_unstuff control may have a slight lawn on the -3 plate, but shouldn’t have any colonies on the -4 and -5. Your mutation strains should have several visible colonies at these dilutions. If they don’t, you should go back and screen several colonies from Day 9 to confirm your inserts are being cloned into the vector. If you cannot pick colonies easily off the plate without picking up background lawn, streak for purification.
Pick 4-6 colonies for each strain and resuspend them in the same epi of 500µL LB without NaCl medium. It is important to use salt free media because the sacB cassette (sucrose sensitivity) only works as a counter-selectable marker under hypotonic conditions. Choosing 4-6 isolates will give you a range of first crossover sites and up your odds of finding some double crossover mutants. Dilute to the -6 in LB without NaCl.
Plate 100µL from the -3, -4, and -5 dilutions on pre-warmed 30&Deg;C LB without NaCl + 5% sucrose plates. You might also add selective media where applicable. (For our rpoB mutations, we also added plated on LB without NaCl + 5% sucrose + 10µg/mL or 20µg/mL of rifampicin because our strains were evolved using rifampicin as a stressor and therefore many of their mutations were likely to confer at least some degree of rifampicin resistance.) Incubate plates at 30°C for 1-2 days.
Plate a chloramphenicol sensitive (like your BK26 ancestor) and a chloramphenicol resistant (like pkov_unstuff in TOPO) strain from the freezer to use as controls for the next part.
Start overnight cultures in LB + 20µg/mL chloramphenicol at 43°C for temporary storage.
Day 12
Select 4-8 colonies for each strain, resuspend them in 100µL of LB without NaCl, and streak them on LB without NaCl + 5% sucrose for purification and LB + 20µg/mL chloramphenicol to confirm the plasmid is gone.
Also streak out suspensions from your chloramphenicol resistant and sensitive control colonies on LB + 20µg/mL chloramphenicol as a comparison. (For antibiotics like chloramphenicol that stop growth, but don’t kill bacteria, sometimes a “ghost streak” of sensitive cells will be visible, so it is important to have a comparison to actual growth.
Day13
If you were not able use selective media to screen for mutants versus wild type recombinants, you can use a pcr technique called TSP genotyping to screen for specific mutations using specially designed primers.
Once you have some candidate double recombinant mutants, use your chromosomal primers located outside the cloning region to amplify the region of interest and prep for sequencing.
Start overnight cultures for freezedowns.
Day 14
Analyze your sequences to confirm that the mutation has been introduced without any scars or other undesired mutations and freeze down your successful double recombinant mutants. Congratulations! Now go re-engineer yourself some ancestors.
Original protocol by: H. Lindsey Date: 11 Sept 12
Protocol Updated by: ___ Date: ___